Create an unattened.xml

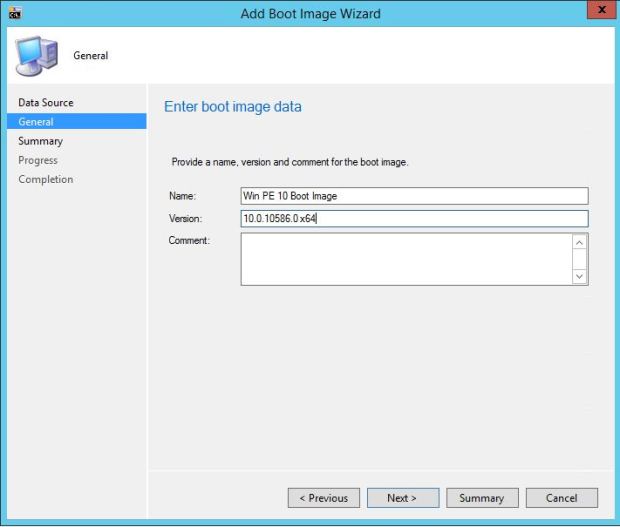
To create an unattened.xml you have a few options one is to use the windows system image manager.

Firstly, open the windows system image manager application

1

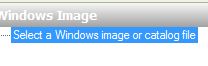
Open up your windows image and select the install wim (in my case windows 10)

2

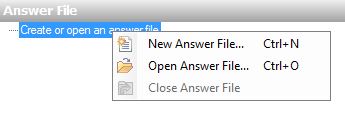
Next select new answer file

3

Now you can make customizations, in this case I will change the language input to GB British

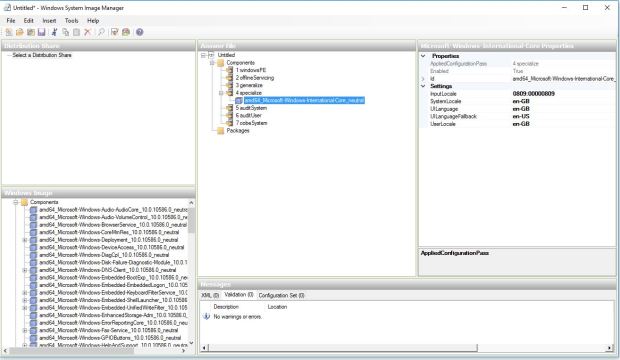
Expand components and find amd64_Microsoft-Windows-International-Core_6.3.9600.16384_neutral

Now change the settings to the following:

InputLocale: en-GB

SystemLocale: en-GB

UILanguage: en-GB

UILanguageFallback: en-US

UserLocale: en-GB

4

Next select tools and validate the changes, you should get no warnings or errors, if that’s the case you can now save the answer file and name it appropriately

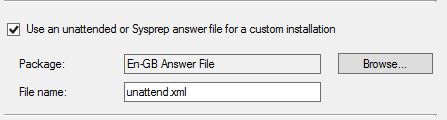
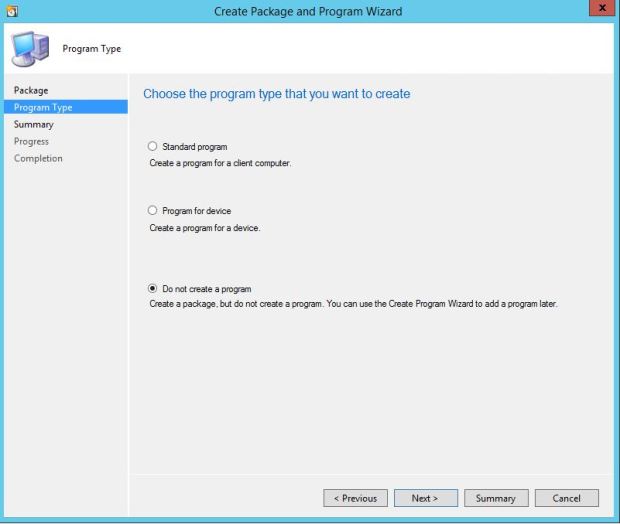
Next copy the file to a share you use for configmgr deployments and create a package (with no program) and distribute

5

In your task sequence under apply operating system select the package you just created and type in the file name including the file extension

6

Creating a Boot Wim

Once you have installed the ADK and included windows preinstallation environment you can copy the wim from the location listed below. This is assuming you are using the windows 10 ADK and you want to create a x64 boot image

1

wim location :

C:\Program Files (x86)\Windows Kits\10\Assessment and Deployment Kit\Windows Preinstallation Environment\amd64\en-us\winpe.wim

Once located copy to your deployment share, in my case Sources\OS Deployment Share\Boot Images\Win10PEx64

Next open up software library > operating systems > boot images

Now select add boot image

2

Select the wim we just copied

3

Name the boot image as you wish and select next until the wizard has finished

4

You will need to distribute the boot image and then if you wish to make it available to pxe deployments. You can select this option in the properties of the boot image

5

Configuring High-Risk Deployment Settings

When deploying a high risk deployment (in most cases a required task sequence) you will find that this will only work in the collection has less than 100 members. This a great safety buffer as its stops you deploying to all desktop and server clients collection for example.  However, if you have a collection over 100 you will find that the collection is missing when trying to advertise the deployment. To resolve this you can make the following changes.

Firstly, navigate to Administration

Then site configuration> sites> your site> properties > Deployment verification


11


You should see the collection size limits, you can now change this to 200 for example or higher, but I advise only increasing it as need to and not say 15000.

Move SCUP 2011 database

So after I setup scup 2011 up I noticed that the database was being stored in the user’s app data, while this didn’t seem to cause any issues I would rather it have been outside of a user location.

So first off we need to find the database, this is displayed In the advanced options in the console, in this case AppData\Local\Microsoft\System Center Updates Publisher 2011\SCUP version number/ scupdb.sdf

1.JPG

Next what we need to do is close any SCUP processes and then copy the folder to a location where we want to store it, I advise locally.

2

Then in C:\Program Files (x86)\System Center Updates Publisher 2011\ you will find a file called Scup2011.exe.config , open this file and change it to

setting name=”SSCEDataFile” serializeAs=”String”>

<value>your new location \5.00.1727.0000\scupdb.sdf</value>

3


Then save and close , restart the sever ( not always necessary ) open the console and you should see the database is located in the new location.

4

Group policy settings were overwritten by a higher authority

I noticed that my update packages were showing mostly as unknown so after a bit of digging i found the following issue.

group policy  disbaling updates 1

looking through the WUAHandler.log I noticed I was getting the following message

Group policy settings were overwritten by a higher authority (Domain Controller) to: Server http://*****************:8530 and Policy ENABLED

group policy  disbaling updates.JPG

This means that something within the domain is overwriting the policy from ConFigMgr

This was an old GPO in my case that had been enabled so once I took that away everything when back to usual in both reports and local logs.

Start Menu layout

To apply he start menu layout your first need to have your xml in a location the computer has read access to or user depending how you apply the GPO. You will also need either enterprise or education editions of windows 10.

Navigate to Computer Configuration > Administrative Templates >Start Menu and Taskbar (or user configuration )

1

Any changes you make to the xml will still apply as long as the time stamp of the file changes.

Edit client cache size in 1606

The 1606 update has so many new features, one of my favorites is the client cache size settings. In previous versions I would use non official tools like right click tools to edit client cache size but now its natively supported.

You will find it under Administration site – site configuration – clients settings

1

Create Default Applications XML

To create a default applications template you first need all the software you plan to use as the defaults installed, for example Adobe Reader.

Firstly, navigate to settings

1

Then default apps and start to make the changes, quick tip even if you have set Adobe to be the default reader when you first open the application or during an install you will still need to change the setting from edge under the PDF file extension.

2.JPG

open an elevated command prompt

And type in

dism /online /Export-DefaultAppAssociations:”%UserProfile%\Desktop\StaffDefaultApplications.xml

3

you can find more information below

https://technet.microsoft.com/en-us/library/hh825038.aspx?f=255&MSPPError=-2147217396

now we have the xml we can either apply during a task sequence or via group policy, please see the guide below for an example of the group policy

Set Default Associations

To set default Associations (applications) via group policy you first need to export your default applications settings, once you have done so move the XML to a share that domain computers have read access to

Now navigate to Administrative Templates\Windows Components\File Explorer\Set a default associations configuration file1.JPG