Move SCUP 2011 database

So after I setup scup 2011 up I noticed that the database was being stored in the user’s app data, while this didn’t seem to cause any issues I would rather it have been outside of a user location.

So first off we need to find the database, this is displayed In the advanced options in the console, in this case AppData\Local\Microsoft\System Center Updates Publisher 2011\SCUP version number/ scupdb.sdf

1.JPG

Next what we need to do is close any SCUP processes and then copy the folder to a location where we want to store it, I advise locally.

2

Then in C:\Program Files (x86)\System Center Updates Publisher 2011\ you will find a file called Scup2011.exe.config , open this file and change it to

setting name=”SSCEDataFile” serializeAs=”String”>

<value>your new location \5.00.1727.0000\scupdb.sdf</value>

3


Then save and close , restart the sever ( not always necessary ) open the console and you should see the database is located in the new location.

4

Group policy settings were overwritten by a higher authority

I noticed that my update packages were showing mostly as unknown so after a bit of digging i found the following issue.

group policy  disbaling updates 1

looking through the WUAHandler.log I noticed I was getting the following message

Group policy settings were overwritten by a higher authority (Domain Controller) to: Server http://*****************:8530 and Policy ENABLED

group policy  disbaling updates.JPG

This means that something within the domain is overwriting the policy from ConFigMgr

This was an old GPO in my case that had been enabled so once I took that away everything when back to usual in both reports and local logs.

Start Menu layout

To apply he start menu layout your first need to have your xml in a location the computer has read access to or user depending how you apply the GPO. You will also need either enterprise or education editions of windows 10.

Navigate to Computer Configuration > Administrative Templates >Start Menu and Taskbar (or user configuration )

1

Any changes you make to the xml will still apply as long as the time stamp of the file changes.

Edit client cache size in 1606

The 1606 update has so many new features, one of my favorites is the client cache size settings. In previous versions I would use non official tools like right click tools to edit client cache size but now its natively supported.

You will find it under Administration site – site configuration – clients settings

1

Create Default Applications XML

To create a default applications template you first need all the software you plan to use as the defaults installed, for example Adobe Reader.

Firstly, navigate to settings

1

Then default apps and start to make the changes, quick tip even if you have set Adobe to be the default reader when you first open the application or during an install you will still need to change the setting from edge under the PDF file extension.

2.JPG

open an elevated command prompt

And type in

dism /online /Export-DefaultAppAssociations:”%UserProfile%\Desktop\StaffDefaultApplications.xml

3

you can find more information below

https://technet.microsoft.com/en-us/library/hh825038.aspx?f=255&MSPPError=-2147217396

now we have the xml we can either apply during a task sequence or via group policy, please see the guide below for an example of the group policy

Set Default Associations

To set default Associations (applications) via group policy you first need to export your default applications settings, once you have done so move the XML to a share that domain computers have read access to

Now navigate to Administrative Templates\Windows Components\File Explorer\Set a default associations configuration file1.JPG

Custom Start Menu Windows 10

So I wanted to make the transition to windows 10 as smooth as possibly for our users and I noticed in a test group their biggest issues were actually signing out.  Now my hope is in time we can resolve this issues with training however I wanted to help them out by adding an obvious shortcut.

Firstly, create the shortcuts by follow my guide below

Sign Out shortcut Windows 10

Once created copy any other shortcuts and pin them to the start menu along with the shutdown.ink

If you want to know more about the default layout take a look at the link below

https://msdn.microsoft.com/en-us/library/windows/hardware/mt171092%28v=vs.85%29.aspx

Next create the layout you want a include the the sign out “log off” and shutdown shortcuts.

1.JPG

Now we are happy we need to export the layout using PowerShell

Us this command Export-Startlayout –path C:\ Startmenu.xml

2.JPG


Now we need to edit the xml so that the location is now in

DesktopApplicationLinkPath=”%ALLUSERSPROFILE%\Microsoft\Windows\Start Menu\Programs\Accessories\shutdown.lnk”/>

3.JPG

You will need to change the file name if it differs from your shortcut including the file extension

Now we have this xml we can enforce is as part of a task sequence or as I prefer on this occasion via group policy. Please see my link below on how to apply with Group policy (assuming your using enterprise edition or education edition of windows 10)


If you wish to add the menu during the OSD you can use this powershell command

 Import-StartLayout -LayoutPath c:\tmp\start.xml -MountPath $env:SystemDrive\

 The final steps are to copy the logout shortcut to the location we referenced in the xml, to do this create a package in ConFigMgr

 Now we can add this to our task sequence by adding a run command, select the logout package and then using the xcopy command below.

4.JPG

I took inspiration from Jörgen and his Internet explorer post on his blog below

http://ccmexec.com/

Sign Out shortcut Windows 10

I decided to create shortcuts for some of my users who are struggling with the change to windows 10 , my solution to there signing out issue is to create some shortcuts in more obvious place. In this blog post I will show you how to create a sign out shortcut.

Firstly right click on the desktop and select shortcut

1

Next copy this command Shutdown.exe –L and select next

2

If you want to create others here is a list

Restart  Shutdown -r -t 00

SetSuspendState Suspend rundll32.exe PowrProf.dll,

Shutdown Shutdown -s -t 00

Give the shortcut a name , in this example sign out and select finish

3

Now you can test your shortcut

Now its time to add an a familiar icon

Now right click the shortcut and go to properties

5

Select change icon and select the appropriate one

6

7

You can now pin to start or even just leave it on the desktop

1606 update failed prerequisite check

So I went to update my test site to 1606 and noticed that it didn’t pass the prerequisites check, before even looking at the logs I did notice that my c: drive was under 15gb after i had recently copied some temporary files over. I moved the files and ran the test again and it all upgraded fine. Nice quick fix

3.JPG

4

Deploying Adobe Reader DC

Adobe reader is one of the mostly commonly deployed applications in an enterprise, in this case I will show you how to deploy the free version Adobe DC. Before we start you will need to download the following

Adobe reader

http://www.adobe.com/support/downloads/product.jsp?platform=windows&product=10

Adobe customization wizard

https://www.adobe.com/devnet-docs/acrobatetk/tools/Wizard/WizardDC/basics.html

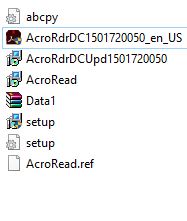
now install the customization wizard and extract the adobe reader .exe , I personally use winrar.

1


Open the customization wizard and start to configure the installation, this will very must depend on your environment and what you want the end user to do.

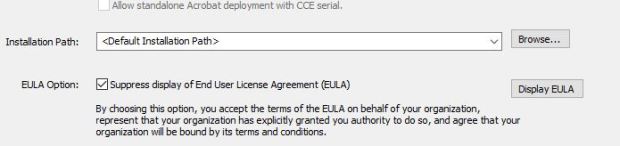
I firstly suppress the EULA option

2

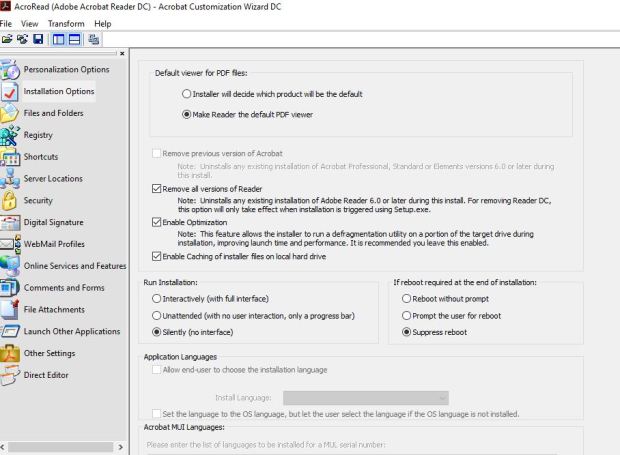
Suppress the reboot, silent installation and make the PDF reader the default reader.

You may also want to remove any other versions of Adobe reader as part of the install

3.JPG

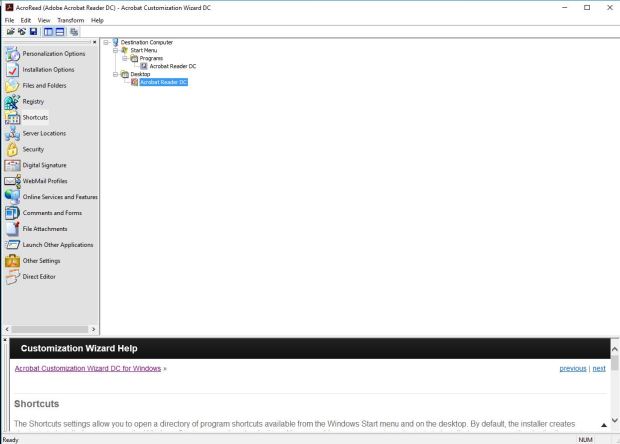
Remove the desktop shortcut if you wish

4

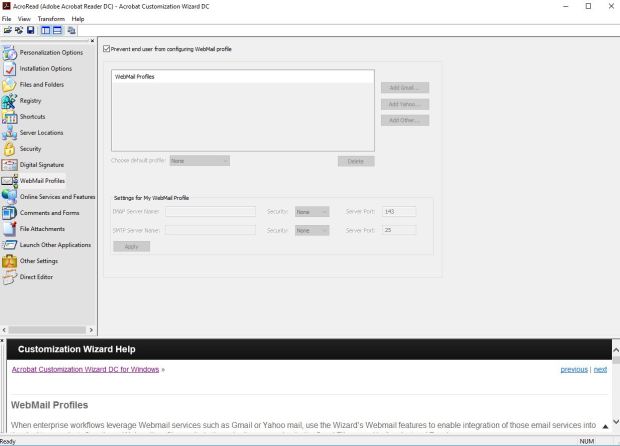
Prevent the end user from configuring webmail profile

5

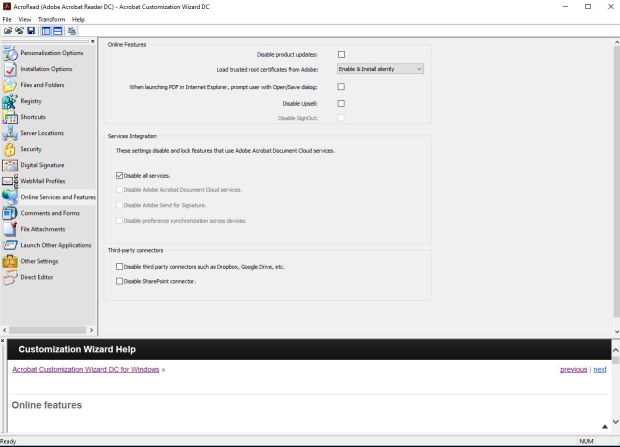
Now I don’t disable product updates even though I use SCUP however I do enable & install silently

You will want to disable upsell and services interaction 9/10

6

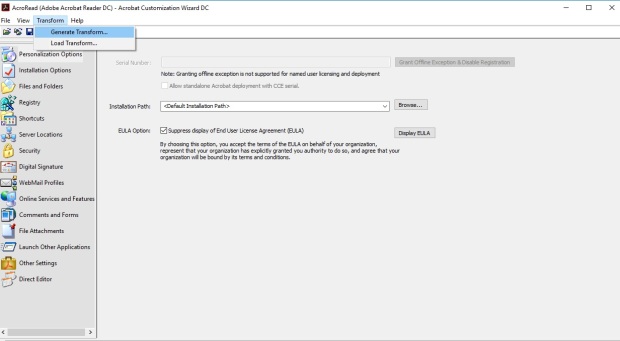
now the configuration is complete you will need to go to transform and then generate transform.

7.jpg

Next copy the folder over to the appropriate files share for your ConFigMgr

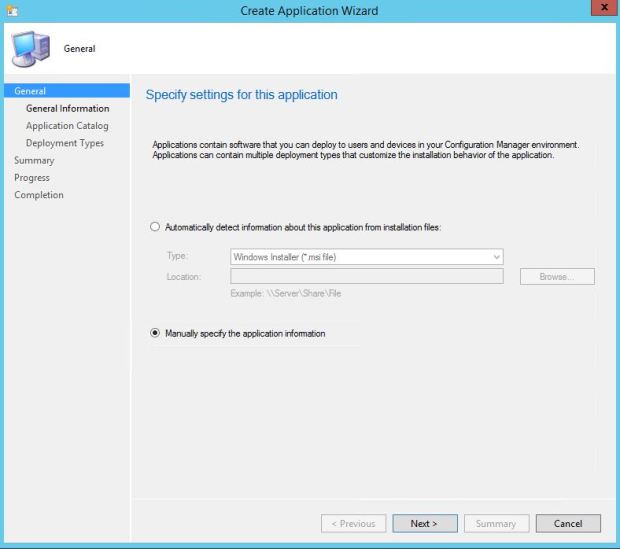
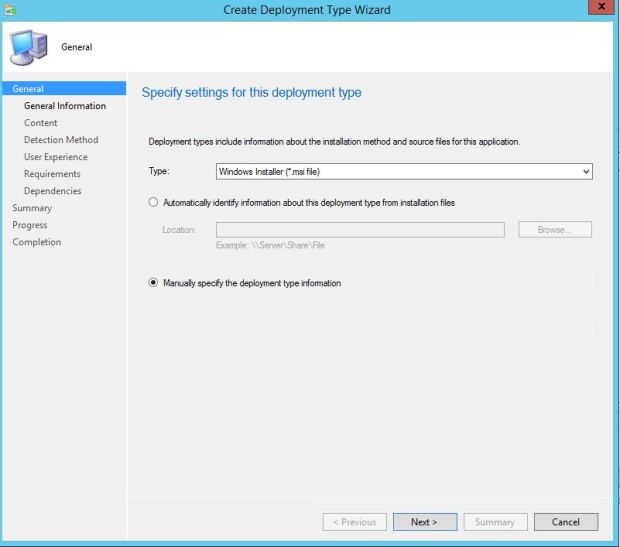
Select create application and then Manually specify application

8

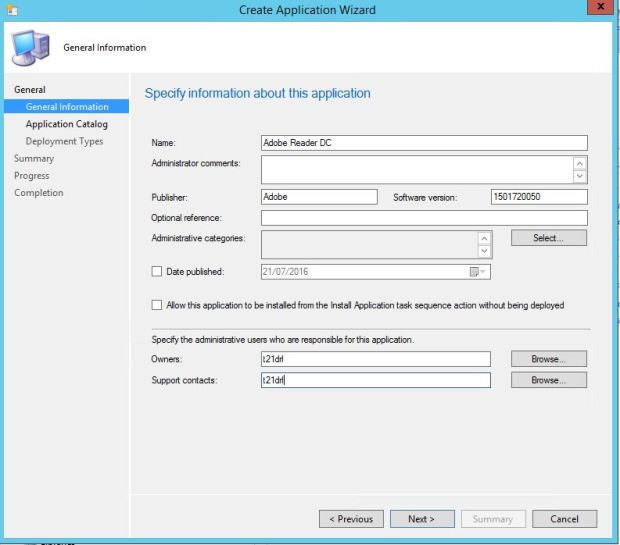
Next name the application and fill in the relevant information
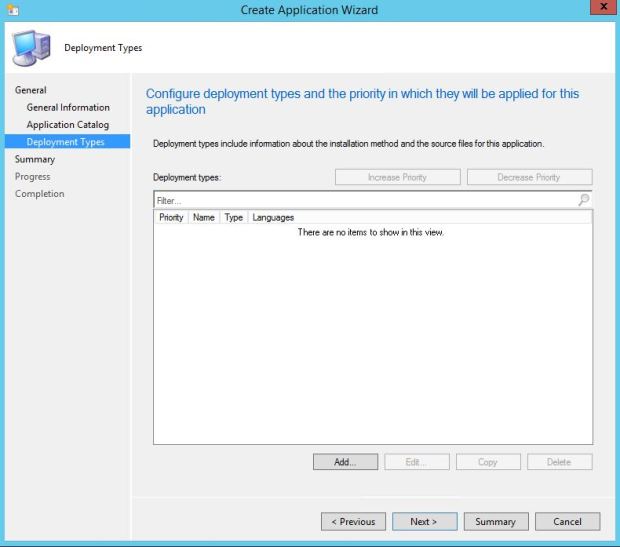
9.JPG

Now select add

10

Manually specify the deployment type information

11

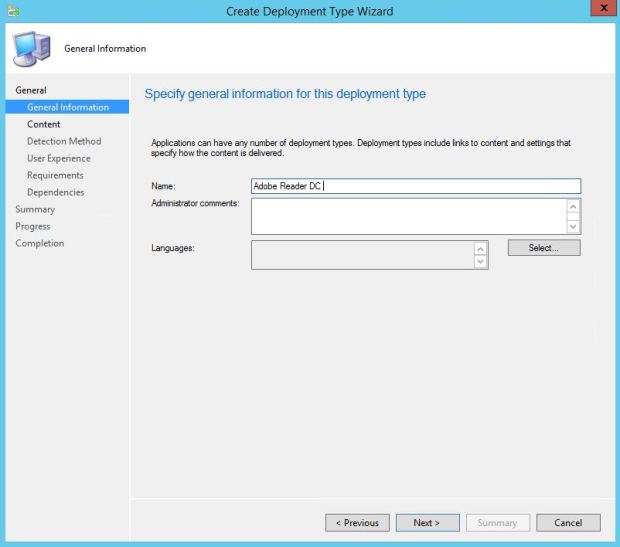
Fill in the relevant information

12.JPG

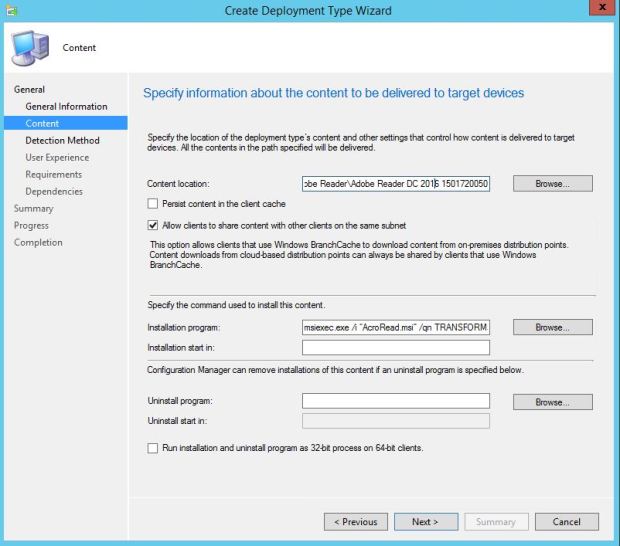
Now we need to specify the source path to the location we copied the extracted Adobe reader exe and MST.

The installation program will be msiexec.exe /i “AcroRead.msi” /qn TRANSFORMS=AcroRead.mst (the mst name will be what you named it during the transform )

13

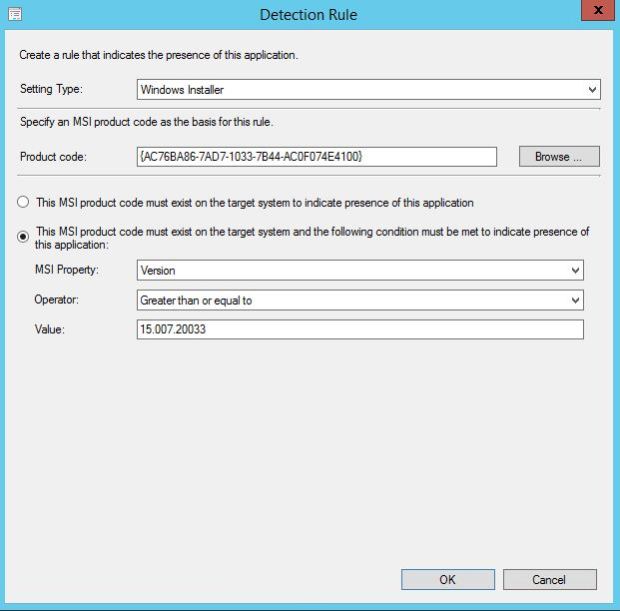
Now for the detection rule we are going to use the windows installer, if you select browse and then location the AcroRead.msi you will get the product code and version filled in automatically. I have also changed the operator to greater than or equal to as my SCUP may update this later on and I want to avoid the deployment uninstalling and then installing the older version in the months to come.

14

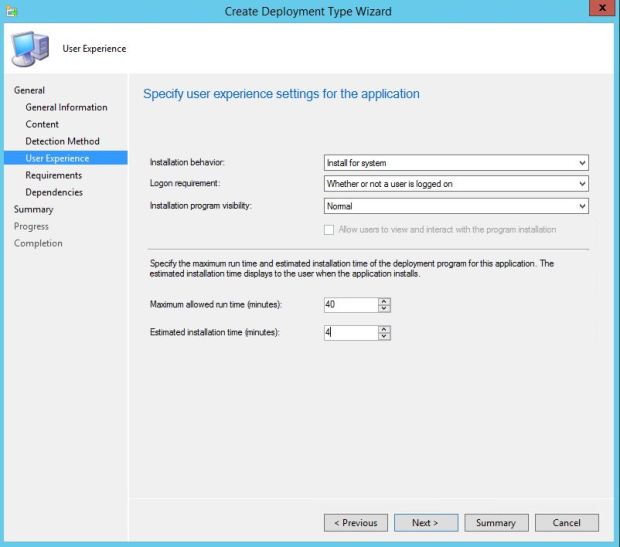
Install for system and whether or not a user is logged on

15

Then select close and deploy as you wish

16.JPG