Install client via SCCM console

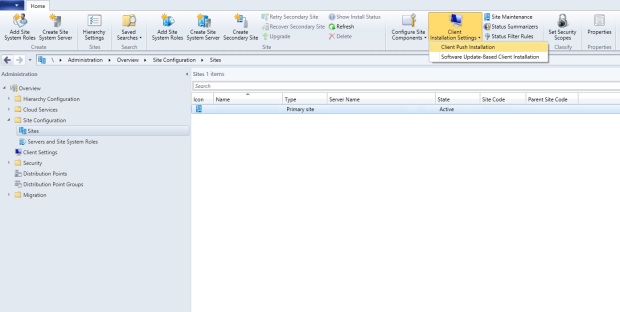
To install the config manager client via client push first navigate to the Administration tab on the console and then expand the Site Configuration tab

Now we need to select the primary site then client installation settings>client push installation

4

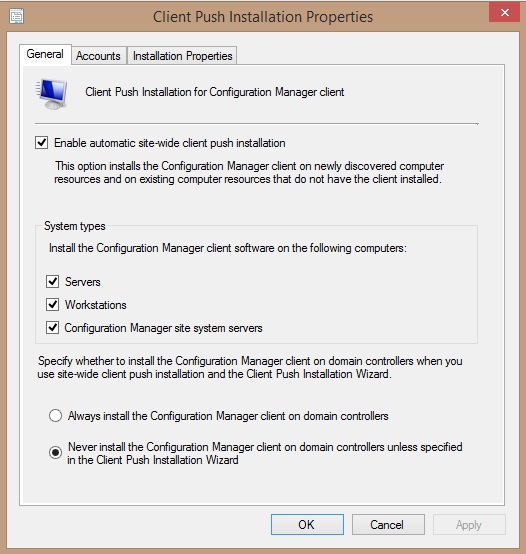
You need to enable automatic site-wide client push installations and select the computer type you want to install to, in my case its all apart from domain controllers.

5

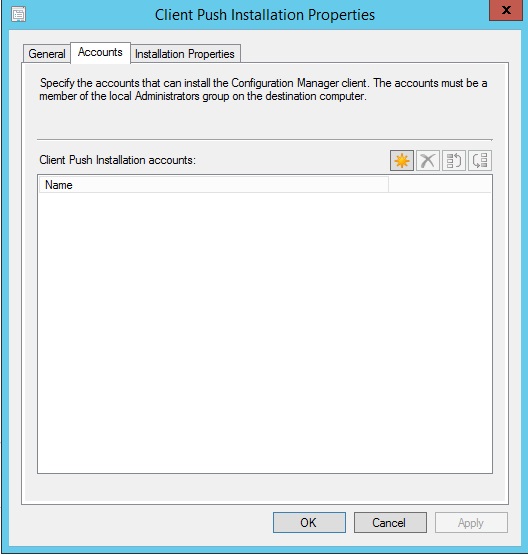
You will need to have created or use an Administrator account that will have permission to both your SCCM server and computers/servers you wish to install the client on. Your can set and test permissions in the Accounts tab.

6

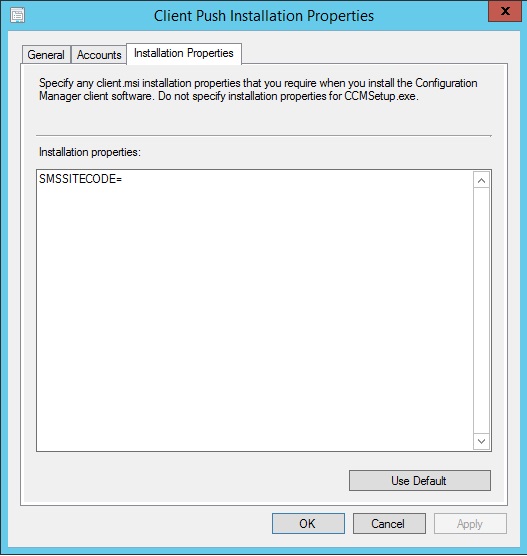
next need to set the site code, this is under the installation properties

7.jpg


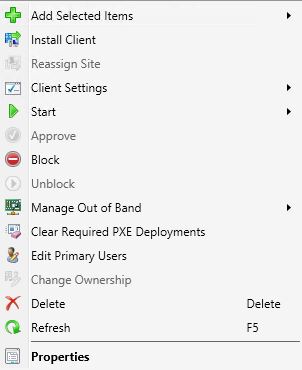
Now we can begin to install the client on machines first click on Assets and Compliance, click on Devices and select the device or devices you wish to install the client on and  select install client
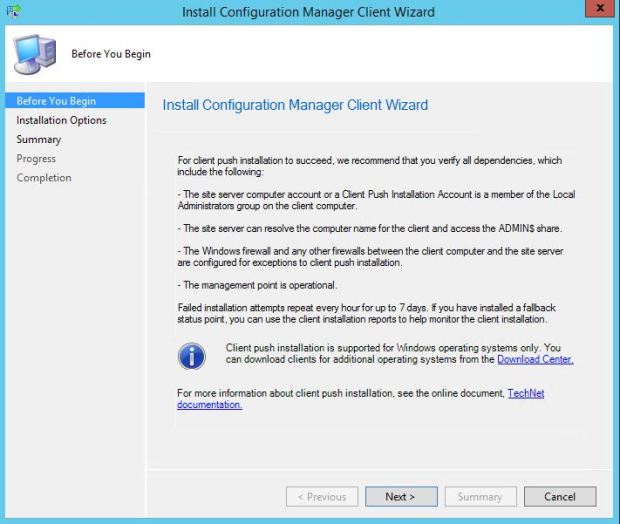
8

select next

9

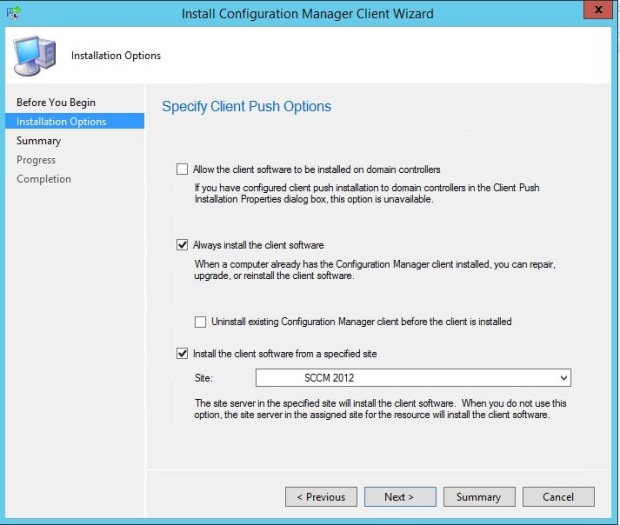
Select Always install client software and select he correct site 

10

You can check the status of the installation on the client machines by looking in task manager and ccmsetup.exe

You can also see more information in c:\windows\ccmsetup\logs\ccmsetup.log

Install client via Group Policy

To install the SCCM client we first need to copy the CCMsetup.msi file and ConfigMgrAdmTemplates folder from the Config manager DVD

The CCMsetup.msi is located in :\SMSSETUP\BIN\I386\CCMsetup.msi, next we need to copy the ADM files which are located :\SMSSETUP\TOOLS\ConfigMgrAdmTemplates

Next we need to open Group Policy and create or use an existing one, I’ve created a new one called SCCMClIENT. Once created click edit

1

Now we need to navigate to COMPUTER CONFIGURATION>POLICIES>SOFTWARE SETTINGS>SOFTWARE INSTALLATION

2

Then right click NEW>PACKAGE and go to the share where you copied the CCMsetup.msi

We now need to add the ADM template on the left pane you will see Administrative Template right click add /Remote Template

3

Go to the location you copied them to and select both then select open>ADD

4

Now if you navigate Administrative Template>Classic Administrative Templates (ADM)>Configuration manager 2012> Configuration manager 2012 Client you will see two templates you need to edit the top one in the screenshot, enable it and change the site code to your site code

5

You can then link the GPO to the your choice of OU and watch your client ping in


Create Driver Package

To create a driver package you first need to capture the drivers you need, you can import a CAB file from Dell for example however I want to select what drivers I need so rather than using the large CAB or Zip files from manufactures i have captured the drivers from a reference machine. A great tool for this is ConfigMgr-Driver-Injector which you download from the link below

https://gallery.technet.microsoft.com/ConfigMgr-Driver-Injector-aae7d17d

A few things to remember if you wish to inject any drivers into a WIM you need to keep their original source of the driver in the same place so I have a folder structure like Imported drivers (source) – Driver Package (packages)

0.1

Go to the software Library tab and right click on drivers and import drivers

1

Next select the location of the driver files you’ve already captured or downloaded, then select next

2

You can then select enable these drivers and allow computers to install them, You can also create categories

3.jpg

Select New Package then give your package a name and in the path section point that to  Driver Packages and update Distribution points when finished 

4

We don’t want to inject any driver directly into the boot image as we only need the network driver which we can add later on.

5

Select next until the wizard has finished create a folder in drivers and move the newly added drivers to this folder.

6


Offline Servicing Update Wim

To update a wim with updates first go to the software library tab

0.1

Expand operating systems images and the select operating system images

1

Right click the image you want to update and select schedule updates

2

You can then select the appropriate system architecture and all updates or certain updates you wish to add

3

You can then add the updates ASAP or on a custom schedule, you can also select update the distribution point one complete

4.JPG

Select next until the wizard is finished

CREATE COLLECTION BASED ON NAME OF DEVICE

To create a collection by computer name first go to Assets and compliance then device collection and right click create new collection. Give the collections and name and limited it to the machine type.

1

Next select Add rule – query rule

2

Give the query and name and then select Edit Query statement

3

Select criterion and change where: to System resource – NetBIOS name

4

5

Then close and refresh the group

If you want to copy the query statement just change the highlighted red text

you will need to use % if you want to add multiple machines eg dt-lt-01 and dt-lt-02 change to dt-lt-%

select SMS_R_SYSTEM.ResourceID,SMS_R_SYSTEM.ResourceType,SMS_R_SYSTEM.Name,SMS_R_SYSTEM.SMSUniqueIdentifier,SMS_R_SYSTEM.ResourceDomainORWorkgroup,SMS_R_SYSTEM.Client from SMS_R_System where SMS_R_System.NetbiosName like “COMP__NAME%”

CREATE COLLECTION BASED ON Operating system

To create a collection by computer name first go to Assets and compliance then device collection and right click create new collection. Give the collections and name and limited it to the machine type.

1

2

Give the query and name and then select Edit Query statement

3

Then select criteria and the sun star symbol

4

Select criterion and change where: to System resource – Operating system name and version

5

Select the version of windows you want in my case 6.3 in server 2012 R2

6

7

Select next and finish the wizard and then refresh the group .

Query statement below

select SMS_R_SYSTEM.ResourceID,SMS_R_SYSTEM.ResourceType,SMS_R_SYSTEM.Name,SMS_R_SYSTEM.SMSUniqueIdentifier,SMS_R_SYSTEM.ResourceDomainORWorkgroup,SMS_R_SYSTEM.Client from SMS_R_System where SMS_R_System.OperatingSystemNameandVersion like “%Server 6.3%”


CREATE COLLECTION BASED ON Machine Type

Right click create collection

1

Then select the limiting collection, and select the collection you want which in this case is all desktop and server clients and select next

2

Select add rule and then query rule

3

Select edit query statement

4

Then select criteria and the sun star symbol

5

Change criterion type: to list of values

Change attribute class: to system enclosure and arrive to chassis types

6

Look at the values and add 3

7

Select ok and then next and refresh the group one he wizard has finished

You can get a list of chassis types from the link below so you can create a laptop group ect

https://blogs.technet.microsoft.com/breben/2009/07/21/chassis-type-values-in-sccm/

also if you want the query statement feel free to copy the below text.

select SMS_R_SYSTEM.ResourceID,SMS_R_SYSTEM.ResourceType,SMS_R_SYSTEM.Name,SMS_R_SYSTEM.SMSUniqueIdentifier,SMS_R_SYSTEM.ResourceDomainORWorkgroup,SMS_R_SYSTEM.Client from SMS_R_System inner join SMS_G_System_SYSTEM_ENCLOSURE on SMS_G_System_SYSTEM_ENCLOSURE.ResourceID = SMS_R_System.ResourceId where  SMS_G_System_SYSTEM_ENCLOSURE.ChassisTypes in ( “3”, )


Create Collection Based on Software

To create a collection based on software type firstly right click on Device Collections and select Create a Device Collection.

1

Name the collection and select the collection you want to include.

2

Select Add Rule Then Query Rule and name the rule, you will then need to select edit Query statement.

3

Select Criteria and then the sunstar symbol.

4

Criterion type should be Simple value, click select and change the attribute class to Installed Applications and then Attribute to Display name.

5

Operator should be is equal to, next change the value to the software you want to query

67

Select next or add other queries or exclusions.

8

This is a statement you can use only difference being its for X64 Applications just change the red text.

select SMS_R_SYSTEM.ResourceID,SMS_R_SYSTEM.ResourceType,SMS_R_SYSTEM.Name,SMS_R_SYSTEM.SMSUniqueIdentifier,SMS_R_SYSTEM.ResourceDomainORWorkgroup,SMS_R_SYSTEM.Client from SMS_R_System inner join SMS_G_System_ADD_REMOVE_PROGRAMS_64 on SMS_G_System_ADD_REMOVE_PROGRAMS_64.ResourceID = SMS_R_System.ResourceId where SMS_G_System_ADD_REMOVE_PROGRAMS_64.DisplayName = “Change this to the Application you want to Query